A Radical Look Into No-Thumb Drill Patterns
With the ever-increasing influx of no-thumb bowlers (mostly 2-handers), the Dudes at Radical felt the need to do a thorough research study of possible layouts for our revolutionary bowling friends. The first thing that became evident was the need for a set of guidelines for drilling balls for the no-thumb bowlers.
Radical Guidelines for No-Thumb Layouts:
- PAPs are measured from the center of finger holes, which is considered the center of grip by USBC, and all static weights are measured from that spot.
- Drill the finger holes at least 3-1/2” deep to remove enough mass to help stabilize the RG axis.
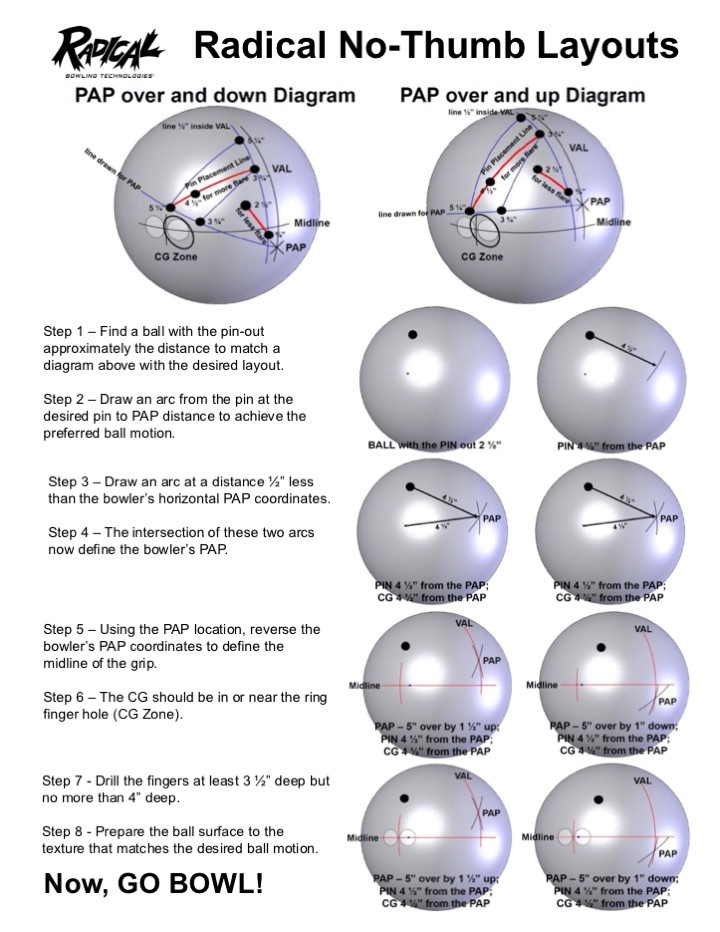
- Try to find the approximate pin-out ball to match the desired layout. Keep in mind that the #1 factor in the layout is the pin to PAP distance.
- Place the CG close to the center of the finger holes to avoid using balance holes if possible. If you have to use balance holes, keep them small. It is important to note that balance holes cause extreme movement of the preferred spin axis of the drilled ball.
- Start with medium to smoother ball surface on the drilled ball in order to prevent extreme wet/dry reaction on the lane. Remember that polish will exaggerate a wet/dry reaction.
- The layouts shown in our diagrams are for right-handed bowlers. Left-handers should mirror the image of these layouts.
We have found that there are two distinct PAP positions for no-thumb bowlers – either over and up or over and down. Some common PAPs are 5” over by 1” to 1-1/2” up or 5” over by 1” to 1-1/2” down. We have found that there are slightly more over and down PAPs than over and up PAPs for the no-thumb bowlers. On both types of PAPs, we recommend placing the CG of the ball in the area of the ring finger hole to minimize the need for a balance hole because the ball will be statically legal without a balance hole.
Most no-thumb bowlers are higher rev players so there will be much less need for strong layouts, except in rare circumstances. We recommend two options with pin placements. The first option places the pin to PAP distance between 3-3/4” to 5-1/4”, and it produces more track flare, more hook, and stronger ball motion. The second option places the pin to PAP distance between 3/4” to 2-1/2”, and it will result in less track flare, less hook, and much more controllable ball motion. The low flare layouts will allow the high rev 2-handed bowlers to play a much more direct line and control the breakpoint.
Just like with any bowling style, the lane conditions will dictate ball choice and desired layouts, and we recommend using a combination of more flare layouts and low flare layouts for a wide range of ball motion. Keep in mind that the resulting ball motion is controlled by the ball design, the layout used, the coverstock, and the surface texture chosen for the coverstock. Remember, the shape of the ball motion on the back half of the lane will significantly affect pin carry. How the ball goes through the pins and where the ball goes off the back of the deck are good indicators of how the ball will carry. The coverstock and the surface texture will determine when the ball slows down.
FOR A BOWLING BALL TO STRIKE IT MUST SLOW DOWN!!!!
